вторник, 29 ноября 2016 г.
понедельник, 29 февраля 2016 г.
Shifting to Digital Intelligence / Digital Marketing Analytics
According to Forrester research:
Analysis of web data can be bucketed into 3 broader categories:
 Organizations in the early stages tend to focus on user acquisition and measuring performance on marketing channels. Organizations extend the analysis efforts from effectiveness of marketing channels to overall impact of business through business performance analytics. As the organization matures, optimization of user experience on the site becomes embedded within the measurement initiatives. Web analytics tools and analysts are primarily focused on marketing analytics and business performance. Product/Site/Customer Analytics is the least served Analytics. Today’s product management teams need better access to data and insights to drive the best user experience on the site. Providing a good site experience is not only helpful in helping the visitors meet the visit goal, but also helps reduce cost as frequency of visit increases. Retained users are known to spend more on the site. User engagement and ultimately higher site conversion helps improve the search Quality Score for the site. Better search Quality Score helps boost SEO rankings and reduced spend for SEM. Google’s search algorithm has Quality Score as a key factor for calculating rankings.
 According to amazing book Web Analytics 2.0 of Avinash Kaushik, Web Analytics tools are very good at answering the “What” question. Product/Site/Customer optimization requires answering the “Why” question. Answering the “Why” question needs access to granular data and deep understanding of user behavior at a session level. This data is high in volume and cardinality. The problem is often referred to as “big data” problem. Additionally, with the changing landscape
for mediums that users interact with the site, the importance to have access to granular data in real-time is becoming a requirement.
Some analysis questions are:
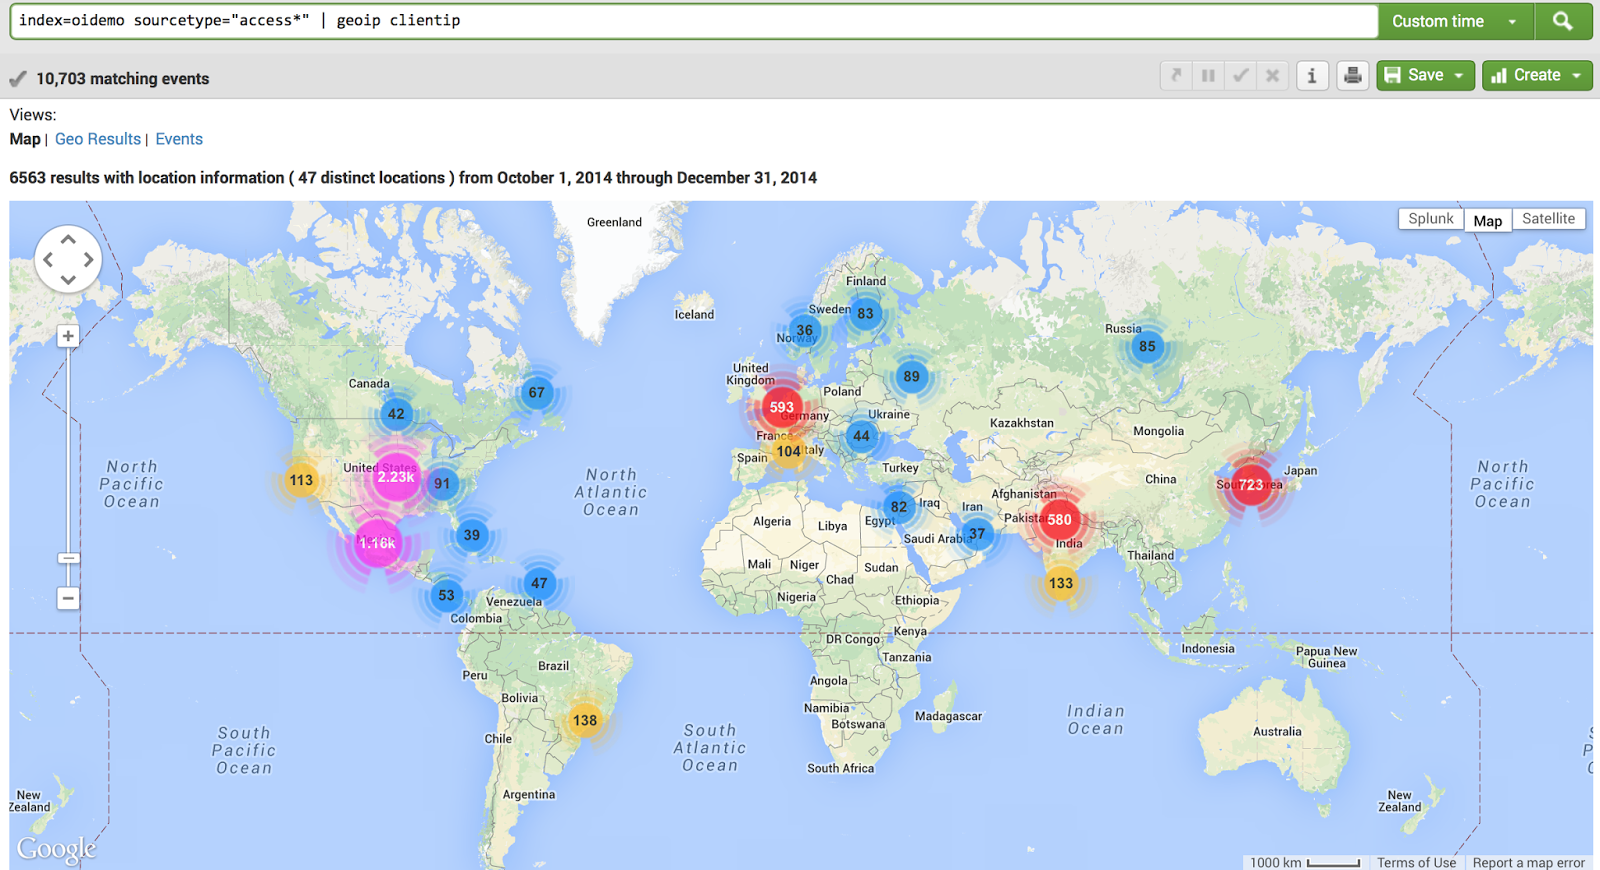
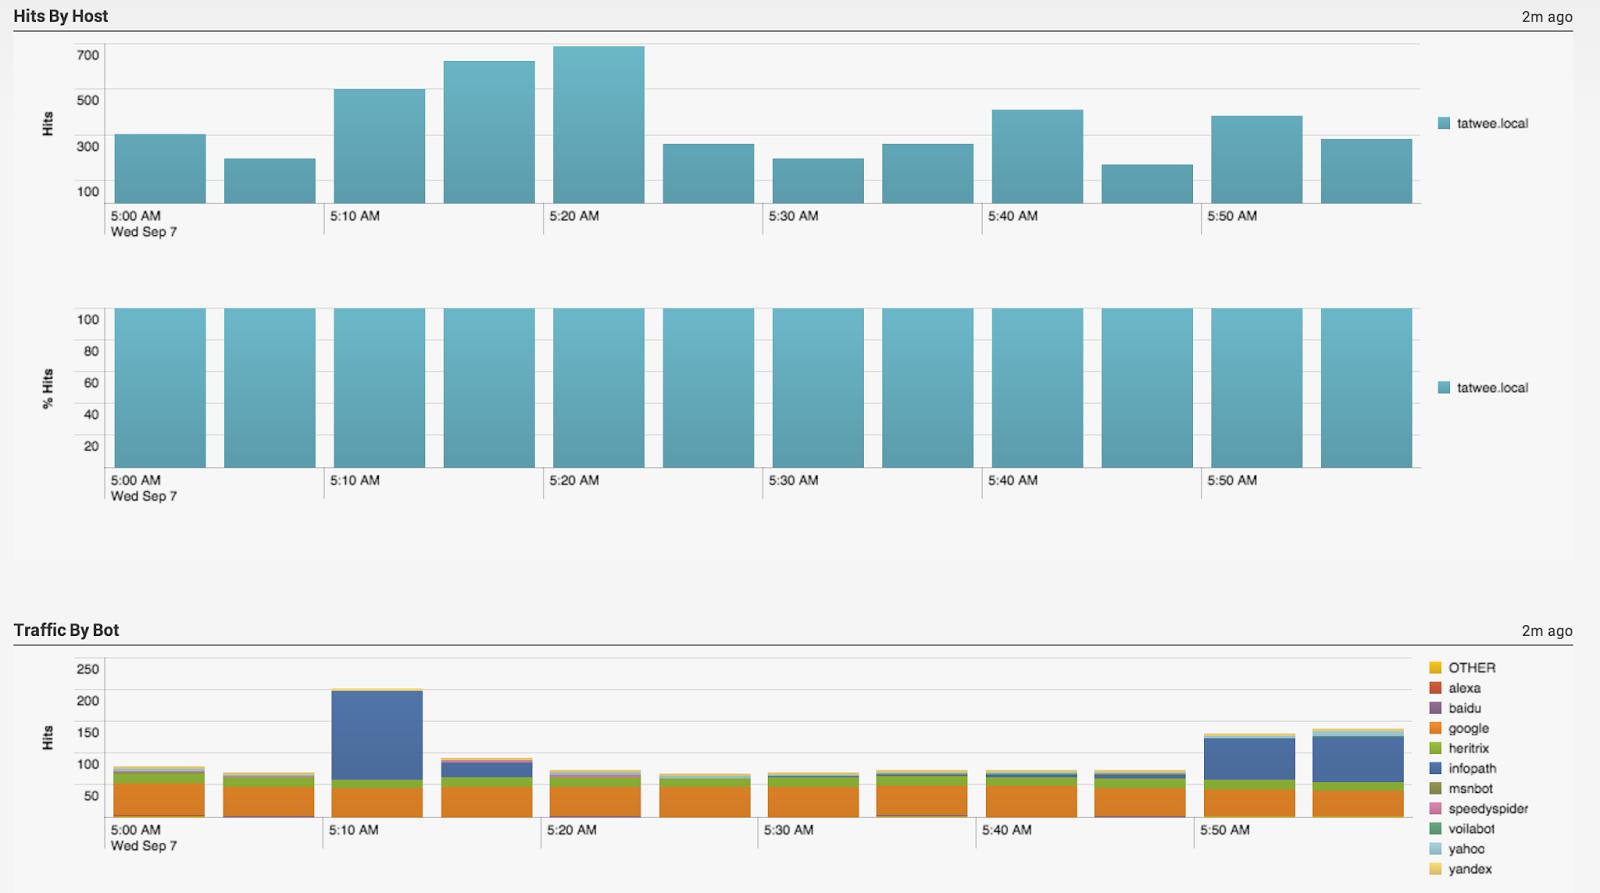
Optimizing the experience in real-time and targeting customers with the right content will help with user experience and improve revenue. Additionally, site uptime is important for revenue and brand protection. Driving Digital Intelligence (DI) for the website is getting ingrained within IT organizations. DI provides all aspects to manage operations for your site. With build in dashboards and reports, all operational elements (page errors, stats by hosts, bot visits etc.) are available in real-time.

Customers are interacting through multiple channels (web, mobile, social, offline, in-store etc.). Multichannel analysis requires stitching data from multiple data sources. The data is a mix of structured, semi-structured and unstructured formats. Stitching this vast variety of data is not only expensive but also resource intensive. Organizations run multiple month data warehousing projects to stitch the data with limited to no success. Additionally, organizations have to spend enormous amount of resources to maintain these processes. Getting integrated views, with real-time data, are distant realities for the efforts. DI can take and stitch data from multiple formats and create integrated views without the overhead of resource/maintenance cost.
 Finally, there is growing buzz about the term “Data Scientist”. Hillary Mason – Chief Scientist at bit.ly defines data scientist as “a data scientist is someone who can obtain, scrub, explore, model and interpret data, blending hacking, statistics and machine learning.“ In speaking to number of industry leaders, it is clear that data scientist spend an inordinate amount of time and effort obtaining, cleaning, transforming the data and preparing the data for analysis. Part of the problem is the variation in the data (unstructured, semi structured etc.) and part of it is volume. Using data that was gathering from DI sources can be used effectively to help the data scientist shift the focus on creating awesome analysis and searching business insights.
Examples of some questions the DI can answer:
3. Can I get real time visibility into pages or properties within the site that are being used for converted users? Can I get the same for non-converting users?
4. Are there specific sites trying to scrape content or offers from your site?
5. Does showing the actual offer change the open rate for email and ultimately the conversion rate?
6. Can we build out a "what if" analysis for marketing or user attribution for web / telecom / social / mobile?

Traditional web analytics techniques were not designed for the breadth of channels, devices, and speed that fuels today's digital interactions. It is fundamentally inadequate to accommodate emerging channels, sophisticated consumers, technical challenges, and the democratization of analytics within data-driven enterprises. Because subpar analytics puts customer relationships at risk, Forrester has redefined the modern practice of web analytics as "digital intelligence."Welcome to the new world, world of Digital Intelligence or Digital Marketing Analytics.
Analysis of web data can be bucketed into 3 broader categories:
- Business Performance Analytics (revenue, margin, biz performance against goals)
- Marketing Analytics (user acquisition through SEO/SEM etc.)
- Product/Site/Customer Analytics (User behavior Analytics when the user is on the site)
If we are going to compare traditional Web Analytics and Digital Intelligence, we can get this list:
Analytics
Types
|
Web Intelligence | Digital Intelligence |
| Customer/Product Analytics | ✔ | ✔ |
| Mobile App Analytics | ✔ | |
| Social Media Analytics | ✔ | |
| Multi-Channel Analytics | ✔ | |
| Big Data - Hadoop | ✔ | ✔ |
 Organizations in the early stages tend to focus on user acquisition and measuring performance on marketing channels. Organizations extend the analysis efforts from effectiveness of marketing channels to overall impact of business through business performance analytics. As the organization matures, optimization of user experience on the site becomes embedded within the measurement initiatives. Web analytics tools and analysts are primarily focused on marketing analytics and business performance. Product/Site/Customer Analytics is the least served Analytics. Today’s product management teams need better access to data and insights to drive the best user experience on the site. Providing a good site experience is not only helpful in helping the visitors meet the visit goal, but also helps reduce cost as frequency of visit increases. Retained users are known to spend more on the site. User engagement and ultimately higher site conversion helps improve the search Quality Score for the site. Better search Quality Score helps boost SEO rankings and reduced spend for SEM. Google’s search algorithm has Quality Score as a key factor for calculating rankings.
 According to amazing book Web Analytics 2.0 of Avinash Kaushik, Web Analytics tools are very good at answering the “What” question. Product/Site/Customer optimization requires answering the “Why” question. Answering the “Why” question needs access to granular data and deep understanding of user behavior at a session level. This data is high in volume and cardinality. The problem is often referred to as “big data” problem. Additionally, with the changing landscape
for mediums that users interact with the site, the importance to have access to granular data in real-time is becoming a requirement.
Some analysis questions are:
- Content or article going viral: Organization will strive to have insights into user interaction with the goal to increase visitor stickiness or visit depth.
- Understanding marketing campaign effectiveness.
- Mobile, social interactions to various content within the online ecosystem.
- Optimizing for inventory (physical or virtual) needs access to detail level data in real-time for understanding opportunities to improve the supply chain.
Optimizing the experience in real-time and targeting customers with the right content will help with user experience and improve revenue. Additionally, site uptime is important for revenue and brand protection. Driving Digital Intelligence (DI) for the website is getting ingrained within IT organizations. DI provides all aspects to manage operations for your site. With build in dashboards and reports, all operational elements (page errors, stats by hosts, bot visits etc.) are available in real-time.

Customers are interacting through multiple channels (web, mobile, social, offline, in-store etc.). Multichannel analysis requires stitching data from multiple data sources. The data is a mix of structured, semi-structured and unstructured formats. Stitching this vast variety of data is not only expensive but also resource intensive. Organizations run multiple month data warehousing projects to stitch the data with limited to no success. Additionally, organizations have to spend enormous amount of resources to maintain these processes. Getting integrated views, with real-time data, are distant realities for the efforts. DI can take and stitch data from multiple formats and create integrated views without the overhead of resource/maintenance cost.
Better analysis needs diving deep into the data, creating segments and doing segmentation on the fly. Traditional web analytics tools have limited segmentation capabilities and options. In most cases, analysts need to predefine segments. Data for these segments is only available after the segments are set. Historical processing of segments is not available. With DI ad-hoc analysis can be done very easily. Segmentation on the fly and ability to do n level segmentation with ability to look at how the segment performed historically is available out of the box.
 Finally, there is growing buzz about the term “Data Scientist”. Hillary Mason – Chief Scientist at bit.ly defines data scientist as “a data scientist is someone who can obtain, scrub, explore, model and interpret data, blending hacking, statistics and machine learning.“ In speaking to number of industry leaders, it is clear that data scientist spend an inordinate amount of time and effort obtaining, cleaning, transforming the data and preparing the data for analysis. Part of the problem is the variation in the data (unstructured, semi structured etc.) and part of it is volume. Using data that was gathering from DI sources can be used effectively to help the data scientist shift the focus on creating awesome analysis and searching business insights.
Examples of some questions the DI can answer:
- In a business that can take order through site or through customer call center:
- Call volume has increased suddenly. Is it related to a campaign or is there is a sudden drop in conversion on the site that is driving a higher call volume?
- Do users calling into the call center spend more than from the site?
- For every x min reduction in hold time, what is the corresponding increase in conversion and revenue?
- Do some customers call and use the website at the same time?
- What is the impact of every dropped call on revenue?
- What is the impact of every extra 1 min hold time?
3. Can I get real time visibility into pages or properties within the site that are being used for converted users? Can I get the same for non-converting users?
4. Are there specific sites trying to scrape content or offers from your site?
5. Does showing the actual offer change the open rate for email and ultimately the conversion rate?
6. Can we build out a "what if" analysis for marketing or user attribution for web / telecom / social / mobile?
среда, 3 февраля 2016 г.
Upgrade of Production BI Server

It's just a production server, and it's on fire
Hotter than a fantasy, longer like a highway
it's living in a AIX server, and it's on fire
Feeling the catastrophe, but it knows it can fly away
Oh, it got both feet on the ground
And it's burning it down
Oh, it got it head in the clouds
And it's not backing down
This production server is on fire
This production server is on fire
It's walking on fire
This production server is on fire
пятница, 15 января 2016 г.
Microstrategy Upgrade from 9 to 10
Short path
The short path is:
1) Delete eisting mucrostrategy software for Test/Dev server
2) Install new version - Microstrategy 10.2 in my example
3) Run configuration wizard, where we should connect existing metadata and than upgrade it
4) Set all settings that was before (Intelligence Server settings, SQL settings, Report layout, LDAP, Memory and other)
5) Run integrity manager (connect upgradet server with old one) and test reports and documents (sql, data. pdf, excel and etc)
6) Fix the difference
7) Ask business users to work and get feedback
8) Repeat this for Prod
Long path according Upgrade guide:
Upgrade best practices
- Always upgrade Intelligence Server before upgrading client applications such as Web or Developer
- Do not downgrade products
- All products should have the same version
Upgrade process checklist
1 Prepare the MicroStrategy system and projects for upgrade - check prerequisites, back-up the production metadata In addition, it is recommended to duplicate production environment2 Prepare SDK upgrade
3 Install and configure Intelligence Server 10 and Developer 10 on a test server
4 Update the production metadata
5 Perform basic stability testing
6 Install and configure Intelligence Server in the production environment
7 Install remaining MicroStrategy products in the production environment
8 Test the upgrade and perform other post upgrades tasks
Reviewing upgrade prerequisites
Before install:- Installation files
- License Key
- Installation location
- Intelligence Server should be installed on its own dedicated server machine.
- MicroStrategy Web should be installed on its own dedicated Web server machine.
- The rest of the products can be installed in varying combinations depending on who intends to use them and on what machines.
Prerequisites we can check in MicroStrategy Installation Guide - Planning your Installation
2 Install current version of Microstrategy
3 Via Project Duplication Wizard duplicate production metadata for the test enviroment
4 Check that test IS connect to test metadata
5 Upgrade test enviroment
Uninstall the previous version of Microstrategy, because Microstrategy 10 is not interoperable with pre-10 release
Before uninstalling we should stop IS than start Microstrategy Installation Wizard
After we should reboot machine
In order to update Metadata we should use Configuration Wizzard
We should check, that projects are not be locked
For Oracle database we should set Maximum Open Cursors parameter to at least 1500
Only projects that are loaded on Intelligence Server can be upgraded
2 Select upgrade existing environment to Microstrategy 10 and then select IS components
3 Under each IS select systems components:
Install remaining Microstrategy products
Reommended upgrade sequence is as follows:
Beginning with version 9 Distribution Services replaced Narrowcast Server as the application that delivers Web delivery subscriptions
We can also migrate subscriptions from within Developer, with the Migrate Subscriptions for Web Deliveries Wizard
The statistics tables and Enterprise Manager repository can be upgraded at the same time, using one of the approaches below:
System sizing guidelines
MicroStrategy needs an amount of free disk space equal to at least twice the on-disc size of the metadata database Moreover, due to performance improvements and enhancements, MicroStrategy may require more memoryUpgrading the project metadata
MicroStrategy requires that you update projects through an Intelligence Server connection (3-tier)High-level steps to configure an upgrade test environment
1 Set up the hardware for the environment2 Install current version of Microstrategy
3 Via Project Duplication Wizard duplicate production metadata for the test enviroment
4 Check that test IS connect to test metadata
5 Upgrade test enviroment
Upgrade Intelligence Server on Unix or Linux
Install new Intelligence Server and developer on a test serverUninstall the previous version of Microstrategy, because Microstrategy 10 is not interoperable with pre-10 release
Before uninstalling we should stop IS than start Microstrategy Installation Wizard
After we should reboot machine
Upgrade the drivers for your data source connections
With Microstrategy 10 all drivers are updating. You must manually update Microstrategy configuration files such as odbc.ini and odbc.shEstablish a connection to the metadata
After installation we should establish connection between Developer and metadata (details in installation guide)Update the Metadata
We can check the script mdRDBMS.sql which update metadataIn order to update Metadata we should use Configuration Wizzard
We should check, that projects are not be locked
For Oracle database we should set Maximum Open Cursors parameter to at least 1500
Only projects that are loaded on Intelligence Server can be upgraded
Metadata Updates using Configuration Wizard
1 Run ./mstrcfgwiz2 Select upgrade existing environment to Microstrategy 10 and then select IS components
3 Under each IS select systems components:
- Upgrade metadata repository
- Lean Objects Migration - new significantly more compact form of object representation in the metadata tables
- Migrate History List messages
- Update Distribution Service Objects
- Execute project logical upgrade
- Lean Objects migration
- update schedules
- update mdx source objects
- update olap service cube cashes to PRIME (PRIME architecture can improve the performance of publishing Intelligent Cubes results)
- Update data import cubes
Perform basic stability testing on the test server
Check interaction between IS and updated metadata (logging in a project, running a report and create a simple report)Upgrade and configure Intelligence Server in the production environment
Install Intelligence ServerInstall remaining Microstrategy products
Upgrading other Micorstrategy products
Reommended upgrade sequence is as follows:
- Intelligence Server and metadata
- Microstrategy Web and Mobile Server
- Microsoft Office
- Developer, Microstrategy Mobile clients, and administrative products such as Enterprise Manager, Command Manager, Object Manager, System Manager, and Operations Manager
Beginning with version 9 Distribution Services replaced Narrowcast Server as the application that delivers Web delivery subscriptions
We can also migrate subscriptions from within Developer, with the Migrate Subscriptions for Web Deliveries Wizard
Upgrading Enterprise Manager and IS statistics tables
A MicroStrategy Enterprise Manager environment includes the statistics tables, the Enterprise Manager repository, and the Enterprise Manager project metadata. Each part of this environment needs to be upgraded.The statistics tables and Enterprise Manager repository can be upgraded at the same time, using one of the approaches below:
- Completed Upgrade
- Phased Upgrade
Complete upgrade of Enterprise Manager statistics and repository
In a complete upgrade, you upgrade all Intelligence Servers, all projects, and Enterprise Manager to the latest version simultaneously. This is the simplest method of upgrading your MicroStrategy environment.- Close all user connections, to ensure that no session activity exists on the Intelligence Servers being monitored by Enterprise Manager.
- Using Operations Manager, run an Enterprise Manager data load. Make sure the Close orphan sessions option is selected. This data load ensures that the statistics tables are completely up to date and that all open Intelligence Server sessions are closed. If you do not run a data load before upgrading Enterprise Manager and the projects on the Intelligence Servers, you may lose access to some statistics data.
- Upgrade all the Intelligence Servers that are being monitored by Enterprise Manager to the latest version through Configuration Wizard.
- Update all projects on those Intelligence Servers to the latest version through Configuration Wizard.
- Shut down all Intelligence Servers that are being monitored by Enterprise Manager.
- Upgrade Enterprise Manager to the latest version.
- Create a backup of the statistics tables and the Enterprise Manager repository. These should be stored in the same database.
- Upgrade the statistics tables and Enterprise Manager repository
- Restart IS
- Using Operational Manager run an Enterprise Manager load
- Upgrade the Enterprise Manager project
Updating the Enterprise Manager Project
MicroStrategy 10 includes major enhancements and updates to the Enterprise Manager project. As a result, older versions of Enterprise Manager projects cannot be used with MicroStrategy 10. However, when upgrading your Enterprise Manager project, your customized Enterprise Manager reports or other objects may be retained.
- Use the Project Duplication Wizard to make a backup of your existing Enterprise Manager project. For detailed information about using Project Duplication, see the Managing Your Projects chapter of the MicroStrategy System Administration Guide.
- From the Start menu, point to All Programs, then MicroStrategy Tools, then select Configuration Wizard. The Configuration Wizard opens.
- Select Upgrade existing environment to MicroStrategy 10, and click Next.
- Select Upgrade Enterprise Manager Project, and click Next. The Enterprise Manager Project Upgrade page opens.
- Provide the following information:
- User Name: Type the MicroStrategy user name that can access and administer the Enterprise Manager project.
- Password: Type the password for the MicroStrategy user that can access and administer the Enterprise Manager project.
Testing the Upgrade
Functional testing
Functional testing verifies that functionality from the previous MicroStrategy version remains the same or improves after an upgrade to a new version. This includes various administrative tasks, as well as viewing, manipulating, and designing reports and documents.Administrative testing
The best way is to run Integrity Manager and compare reports and etc.
End user testing
End users are the best source of day-to-day use cases for your MicroStrategy system. Because they are able to create accurate real-world testing conditions, end users must dedicate time to executing their test cases and report any unexpected behaviors. The functional end user testing period may encompass a few days or several weeks, depending on the size of your MicroStrategy system.Integrity testing
After upgrading your system, you should ensure that the changes involved do not alter any of your report results. MicroStrategy Integrity Manager is designed to execute reports and documents from a project, note whether or not they execute, view their results, and compare them against reports and documents from another project.Best practices for integrity testing
MicroStrategy recommends the following best practices when testing your upgrade with Integrity Manager:
- Create an integrity test comparing reports from the upgraded test environment with the same reports in the production environment, so that you can easily see where any differences are.
- Execute the tests against the production data warehouse. If this is not possible, test against a data warehouse that resembles the production data warehouse as closely as possible.
- Execute the tests under production users, groups, and security roles, instead of specially-created integrity test users and groups, so that the tests match the production environment as closely as possible.
- Use prompt answers that are used in the production environment.
- If you are upgrading from MicroStrategy 9.0 or later, use default personal prompt answers for prompts.
Performance testing
Performance testing verifies that the response time, resource usage, and throughput in your environment meet the expectations of your end users. In the context of an upgrade scenario, the goal of performance testing is to verify that the system’s performance is maintained or improved by the upgrade.
During a performance test, you should ensure that memory and CPU usage are within acceptable ranges.
There are three different kinds of performance tests:
- Load tests verify that the system is stable under normal usage conditions.
- Stress tests verify that the system is stable under high usage conditions.
- Capacity tests help determine the maximum workload the system can support while still meeting performance expectations.
Integrity Manager
You can use Integrity Manager to automate your performance testing. Integrity Manager can record how long it takes to execute a report or document. It can also execute the reports or documents multiple times in the same test and record the time for each execution cycle to give you a better idea of the average Intelligence Server performance time.
A single instance of Integrity Manager can execute a performance test that duplicates the effect of a user running multiple reports. This is suitable for load testing. If you are performing stress testing or capacity testing, you may need to distribute the load among multiple user sessions. To do this, you must run several instances of Integrity Manager, each executing a performance test.Resolving problems encountered during the upgrade
- Make sure you have met the system requirements and other prerequisites for the current version of MicroStrategy, as noted in Reviewing upgrade prerequisites, page 11.
- Be aware of the level of interoperability between the current version of MicroStrategy and the version you are upgrading from, as noted in Client/server interoperability, page 2.
- Any errors in the upgrade process are likely to be written to the installation log file, install.log. This file is in the directory that you specify as the installation directory during the upgrade.
- When you use the Configuration Wizard to add tables to the metadata or update your projects, each SQL statement that is executed is logged to the Configuration Wizard log file, MACfgWiz.xml. This log file is in the Log subfolder of the main MicroStrategy directory. You can analyze the log file using a third-party log viewer, such as the Apache Chainsaw log viewer, which can be downloaded from http://logging.apache.org/chainsaw/index.html.
- If MicroStrategy Web users encounter errors after you upgrade MicroStrategy Web, you may need to clear your application and web server caches, or your users may need to clear their browser caches. For instructions on how to clear these caches, see the documentation for your web server, application server, and web browser.
- MicroStrategy recommends upgrading to the latest version without uninstalling the previous version of MicroStrategy. However, in rare situations, issues may be encountered as a result of an in-place upgrade.
After the Upgrade
Checking and assigning privileges
It is essential you take the time to assign and make changes to the many user permissions that affect your MicroStrategy system. Review the following for a list of privileges you should manually assign to users after upgrading MicroStrategy.To access the Find and Replace Privileges dialog box
- In Developer, log in to a project source as an administrator.
- From the Administration menu, point to User Management, and select Find and Replace Privileges. The Find and Replace Privileges dialog box opens
Completing the upgrade process
Once the upgrade process is complete, you should tune and optimize your MicroStrategy system for performance and stability reasons. For information about administering, maintaining, and optimizing your MicroStrategy system and projects, see the Tuning chapter of the MicroStrategy System Administration Guide.CA Erwin Upgrate from r8 to r9
Background:
Our company currently uses Erwin Datamodeler Workgroup edition with Mart r8. This release doesn't support Oracle 12C. As a result, we are going to upgrade r8 to r9. Below you can find information about r8 and r9 architecture and action plan of installation r9 and upgrading of mart.Introduction:
CA ERwin Data Modeler Workgroup Edition provides a multiuser modeling environment that makes coordinated, large-scale modeling possible. It enables collaboration among project managers, data modeling team members, and standards administrators by providing workgroup modeling services, including conflict resolution, versioning, security, and standards management. You can coordinate the efforts of model teams to document existing systems, create new eBusiness systems, and drive data standardization. Model sharing encourages teamwork, so modelers can work together more efficiently to optimize model-based development. Your modelers get more work done in less time with better results.Earlier, when you upgraded to a new version of CA ERwin DM, only the schema was upgraded. To upgrade your models, you opened each model in the new version. This process took much of your time, especially when you had to upgrade large models. In CA ERwin DM Version 9.0, upgrading models is automated through the Mart Upgrade utility. The utility lets you upgrade not just models, but users, profiles, and permissions too. In addition, the utility also lets you upgrade to a different database.
New features:
- In release 9 we can migrate users, profiles and permissions
- New MartUpgrate utility automatically migrates your models and the other data
- We can selectively migrate models
- We can pause upgrade and start it later
- The MartUpgrade utility available with CA Erwin Data Modeler Workgroup Edition r9 Installation
- MartUpgrade Utility does not install with the Mart Server, it installs with Data Modeler Workgroup Edition
- You must enable that option during installation
Mart Architecture
In order to upgrade Mart we should install Mart 9, because it has new architecture. There are 2 pictures of current architecture and architecture of new mart:Erwin r8 architecture:
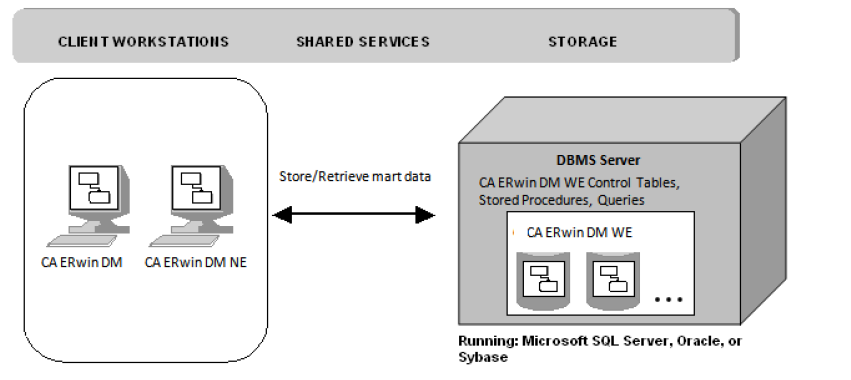

The new architecture has the following benefits:
- Separate logical and physical users: In the previous versions, Mart (or Model Manager) users required database level privileges to access Mart functionality. The Mart database administrators added or deleted users in the Mart database. This approach is changed now. The logical users are separated from physical users, so Mart Administrators can create Mart users without creating the corresponding database users.
- Authentication through Active Directory services: Earlier, if you wanted to provide access to a user group, you added each user individually. Now, because of the new architecture, you can use the Active Directory services and can provide access to the group. Anyone who is part of the group gets access.
- Mart administration outside CA ERwin Data Modeler: In the previous versions, Mart Administrators used CA ERwin Data Modeler for administrative activities such as permissions management. This required non-modelers to know how to use CA ERwin Data Modeler. In the new architecture, the administration component (CA ERwin Web Admin) is built on a separate layer on top of CA ERwin Data Modeler and is hosted on a Web server. Mart Administrators can access CA ERwin Web Admin from any computer and can perform administrative activities through a web console.
Installation and Configuration of Mart r9
Mart comprises the following components:
- Database (Oracle)
- Applications
- Web server (Tomcat or IIS)

Installation Checklist
To use Oracle as the Mart database:
- You know the user name and password to connect to the database.
- You know the port number where Oracle is running.
- You know the name of the database.
- You know the IP address or the name of the computer where the database is running.
- You have created a data tablespace of at least 32 MB.
- You have created an index of at least 32 MB.
- You have created a temporary tablespace.
- You have assigned data tablespace as default tablespace to this user.
- You have assigned the temporary tablespace that you have created to this user.
- You have created the CA ERwin Data Modeler Workgroup Edition Installer role.
- You have granted Oracle privileges to the Installer role.
To install Mart Server:
- You know the server name where you have installed the web server. For example, you know the computer name where Tomcat is installed.
- If you have changed the default port number, you know the port number on which the web server is running.
- You know the computer name where you have created the Mart database.
- You know the port number where the database is running.
- You know the database instance name if you are using SQL Server.
- You know the user name and password to connect to the database.
Prerequisition
Hardware requirements (based on physical hardware performance, not a virtual environment):
- 2 GHZ or higher dual core processor
- 4 GB RAM (8 GB or more for large marts)
- 4 GB of disk space or more as required to support your specific mart
Operating system:
- Microsoft Windows Vista
- Microsoft Windows 2008 Server SP2
- Microsoft Windows 2003 Server SP2
- Microsoft Windows XP SP3
- Microsoft Windows 7Notes:
- CA ERwin Data Modeler has only been certified on the 32-bit versions of the Windows operating systems described in the preceding list. CA ERwin Data Modeler is a 32-bit application. You may experience problems running CA ERwin Data Modeler on a 64-bit operating system.
- CA ERwin Data Modeler is compatible with Microsoft Windows 8 Release Preview. You may experience problems with shortcuts and CA ERwin DM third-party components.
- Microsoft .NET Framework 3.5 or higher
- All current Microsoft Windows critical updates are applied
Database:
- Oracle
Other requirements
Help ensure that the following additional requirements are met:
- If you want to use Microsoft IIS as the web server, you have configured it.
- The DBMS is installed and prepared for creating the Mart Database.
- The Mart database is created. At least one user with administrator privileges is present. If you are using Oracle, you have run the initial queries. For more information about the initial queries, see the Implementation Guide.
Prepare Your DBMS Environment
Perform the following setup tasks in your DBMS environment before you can install and use the software:
- Install the DBMS on the server where you plan to store the mart.For more information about memory and disk space requirements, see the system requirements for each DBMS (Microsoft SQL Server, Sybase, and Oracle).
- Create the mart.Use the DBMS features to create or identify the required storage objects and the mart. The specific requirements vary depending on your DBMS type.
Install CA ERwin Mart Server
The Mart Server and Mart Admin war files are deployed on a Web server. You can either use an existing web server, or install the web server through the CA ERwin MartServer Installation Wizard. You must install CA ERwin Mart Server and configure it regardless of whether you use Mart Server as a Windows service.
Follow these steps:
- Download the Mart Server.exe file from the online CA Technologies product page and run it.
- The CA ERwin MartServer Installation Wizard appears.
- Go through the wizard steps to install CA ERwin Mart Server.Depending on the options you select, CA ERwin Mart Server and/or Java Runtime Environment (JRE) and Tomcat are installed.Note: If Java (any version) is already available in the computer and the environment variable JRE_HOME is set, the installer overwrites JRE_HOME with the new Java path. The JRE version that is shipped with the installer is 1.6.0_31. If a Tomcat web server is already installed in the computer and the environment variable CATALINA_HOME is set, the installer replaces CATALINA_HOME with the new path.
- After you close the wizard, from the Windows Start menu, click All Programs, CA, ERwin, ERwin Mart Server r9, Configure MartServer.The CA ERwin Mart Configuration dialog appears.
Configure the CA ERwin Mart Server
- Complete the following fields in the Mart Server tab:
Note: Use a new database. Do not specify the name of an existing database that you have used for an older version of Mart.Note: The following fields--Domain Controller Name, Domain/User Name, and Password are required only if you are using Active Directory authentication.
Configure CA ERwin Mart Administrator
- Enter the following information in the Mart Administrator tab:
- Click Configure.The CA ERwin Mart Administrator and the Mart Server are configured.
Initialize Mart
When you access the Mart database through CA ERwin Mart Administrator for the first time, you must initialize the database.
Note: Before you proceed, verify that you have installed a DBMS and created the Mart database. If you are using Oracle, verify that you have run the initial queries. If the Mart is already initialized, the Login page appears.
When you open CA ERwin Mart Administrator for the first time, the Initialize Mart web page that is relevant to your Mart database appears.
Log In to CA ERwin Mart Administrator and Configure Settings
After Mart is initialized, the user who initialized must log in first. When you log in to Mart for the first time, configure it per the requirements of your organization. You can configure the following settings:
- Default profile for the model creator
- Use default password
- Email notification
Follow these steps:
- From the Windows Start menu, click All Programs, CA, ERwin, ERwin Mart Server r9, CA ERwin Mart Administrator and log in.The CA ERwin Mart Administrator home page appears.
- Click Settings.
- Complete the following fields:
Upgrade Process
There are two types of upgrade. Moreover, there are some prerequisitions:- source mart r8.0 or later
- remove any locks from models
- Min 2 gb space
- A r90 mart must pre-exist
- OS 32 bit
- database client software
- license
- two databases (old mart database and new mart database), they can reside on the same machine or on two different server machines

Standalone model
The upgrade r8 to r9 is directOpen the *Erwin file using File|Open and upgrade it within r8 CA Erwin DM
MART upgrade
The Upgrade Mart utility lets you upgrade models in several ways. You can choose the best way that helps you get started with your work quickly. Upgrade models in one of the following ways:
- Upgrade the top ‘n’ versions.
- Upgrade only the marked versions.
- Upgrade all marked versions and top 'n' versions.
- Upgrade all the versions of all the models.
Regardless of the option you select, you can start working on a model after the model is upgraded. You do not need to wait until all the models are upgraded.
The Upgrade Mart utility lets you pause the process any time and start again. When you pause, the utility completes upgrading the current model before stopping. When you restart the upgrade process, the utility continues from the point it had stopped. The utility then displays the models that are not yet upgraded in the list of models that you had selected.
The following diagram illustrates how you upgrade models:

CA Erwin macros
CA Erwin offers us list of macros which can make our life easy. Let's meet them:
%AttName - attribute name
%AttDomain - logical domain name
%ColName - column name
%ColDomain - physical domain name
%EntityName - entity name of the current entity
%EntityProp (UDP Name) entity UDP value of the same name specified
%Lower - puts the object name in lower case
%OwnerEntity - name of the entity that ownes the current attribute
%TableProp (UDP Name) table UDP value of the name specifified
%TableName - table name
%Upper - puts the object name in upper case
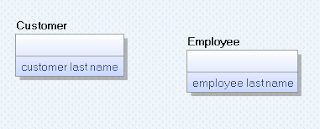
Let's look on particular example. For example, we can create new domain Last Name. It could be Student Last Name, Employer Last Name or etc.
The advantage of domain that we can reuse one object many times. It is simply saves time and increases productivity and quality of data models.

We just use macro: %Lower (%OwnerEntity %AttDomain)
%AttName - attribute name
%AttDomain - logical domain name
%ColName - column name
%ColDomain - physical domain name
%EntityName - entity name of the current entity
%EntityProp (UDP Name) entity UDP value of the same name specified
%Lower - puts the object name in lower case
%OwnerEntity - name of the entity that ownes the current attribute
%TableProp (UDP Name) table UDP value of the name specifified
%TableName - table name
%Upper - puts the object name in upper case
Let's look on particular example. For example, we can create new domain Last Name. It could be Student Last Name, Employer Last Name or etc.
The advantage of domain that we can reuse one object many times. It is simply saves time and increases productivity and quality of data models.

We just use macro: %Lower (%OwnerEntity %AttDomain)

пятница, 8 января 2016 г.
Microstrategy Web - apply setting for all users
Recently, I got one request from user, that she wanted see 12 columns per page and she saw only 10. However, my user saw all 12. In order to fix it we should change prefernces - grid display. If we want to change it for all users, then we need login as administrator and then go to preferences. In preference level choose Projects Defauls. Now we can set properties for all users.


SAP Lumira Essentials
My first experience with SAP Lumira was when it has another name - Visual Intelligence. In that time every analytical vendor try to copy Tableau. It is a kind of user friendly, intuitive drag and drop things. It really works with Tableau, however not so good with other vedors. Any way SAP constantly update their product and try to improve it.
My personal opinion, that there are only two BI leaders on the market Tableau and Microstrategy. The idea is simple - these companies have only one product, they don't sell databases, ERP systems and etc, as a result they really care about quality of their product. I don't want to compare these two leaders, I believe they serve for diffrent purpose and I would like to have both of this product in company.
Let's come back to Lumira. I like that it gives me opportunity to use SAP BO universes, this is the main advantage. Moreover, it has an option to create nice visualizations and infografic. But I dont think that it is standalone product. It is just a good addition staff for SAP BO Enterprise.
Anythey, I had a chance to write a book about Lumira in order to help business users, who need to work with it, very quickly understand this product and learn through practical exercises.
There is a book:

About This Book
- Create a powerful data discovery experience with the advanced capabilities of SAP Lumira
- Find business insights in your data through data blending, wrangling, transformation, and visualization
- A fast-paced guide packed with hands-on practical examples, real-world solutions, and best practices to get you started with SAP Lumira
Who This Book Is For
If you are a SAP user, business analyst, BI developer, or a junior data engineer who wants to use SAP Lumira to build creative visualizations, this book is for you. You should have a reasonable level of knowledge of SAP Business Objects and its components.
What You Will Learn
- Deploy SAP Lumira on your computer and learn more about the SAP Lumira interface
- Extract data from different sources using SAP Lumira's data connecters
- Prepare, filter, clean, and format your data
- Discover visualization techniques and data discovery methods
- Administrate and customize SAP Lumira to get basic knowledge of its SDK
- Create various charts to deliver fantastic data visualizations
- Connect to SAP BusinessObjects BI Platform and SAP HANA to extract, prepare, and visualize data
In Detail
SAP Lumira allows you to combine data from multiple sources into a single view and create engaging visualizations quickly and easily. It is a reporting platform that helps users access data and independently perform analysis. With the increasing interest in data discovery, self-service BI, and visualization around the world, tools like SAP Lumira help to eliminate the complexities of analyzing and discovering data.
Learn data discovery techniques, build amazing visualizations, create fantastic stories, and share your visualizations through an electronic medium with one of the most powerful tools around―SAP Lumira.
You will begin with an overview of the SAP Lumira family of products. You will then go through various data discovery techniques using real-world scenarios of an online e-commerce retailer through detailed recipes on the installation, administration, and customization of SAP Lumira. Next, you will work with data, starting from acquiring data from various data sources, then preparing and visualizing it using the rich functionality of SAP Lumira. Finally, you will present data via a data story or infographic and publish it across your organization or on the World Wide Web.
Style and approach
This is a step-by-step guide to learning SAP Lumira essentials packed with examples on real-world problems and solutions.
PS I even got my first review:)
1 of 1 people found the following review helpful
By Katie Wolterman on December 11, 2015
Format: Paperback
I'm about midway through the ebook edition of the book and I have found it to be quite helpful. We are still in the middle of our implementation of SAP ByDesign so there is only a limited amount of data to work with, but through reading this book we have come up with some new ideas on how to utilize Lumira to better present our data to our suppliers, clients and employees. The instructions and exercises (you can download the files from the publisher website) are clear and well illustrated. Since we are a reseller whose clients are retailers, the fake company used for examples in the book had some examples which also worked for us. Overall recommended for people who have knowledge in core SAP platforms or BusinessObjects and are interested in making more attractive charts and graphs that come in the vanilla package.
Learning Hunk
I would like to share infromation about my book which was written by me and my ex colleague Sergey Sheypack who is an expert with Hadoop. We try to consolidate information about Hunk and teach people how to use it throuhg technical exercises starting from downloading software. As a data source we used Hadoop Cloudera, Amazon Elastic Map Reduce and Mongo Db.
Hunk is good, but not perfect. It works fine, till you want to do something out of the box. As a result we recommend to have java developer who can fix all isuess:) But you know, that splunk is a great company and I belive soon they will burst Hunk and it will become the leader on the market.
There is our book:

About This Book
- Explore your data in Hadoop and NoSQL data stores
- Create and optimize your reporting experience with advanced data visualizations and data analytics
- A comprehensive developer's guide that helps you create outstanding analytical solutions efficiently
Who This Book Is For
If you are Hadoop developers who want to build efficient real-time Operation Intelligence Solutions based on Hadoop deployments or various NoSQL data stores using Hunk, this book is for you. Some familiarity with Splunk is assumed.
What You Will Learn
- Deploy and configure Hunk on top of Cloudera Hadoop
- Create and configure Virtual Indexes for datasets
- Make your data presentable using the wide variety of data visualization components and knowledge objects
- Design a data model using Hunk best practices
- Add more flexibility to your analytics solution via extended SDK and custom visualizations
- Discover data using MongoDB as a data source
- Integrate Hunk with AWS Elastic MapReduce to improve scalability
In Detail
Hunk is the big data analytics platform that lets you rapidly explore, analyse, and visualize data in Hadoop and NoSQL data stores. It provides a single, fluid user experience, designed to show you insights from your big data without the need for specialized skills, fixed schemas, or months of development. Hunk goes beyond typical data analysis methods and gives you the power to rapidly detect patterns and find anomalies across petabytes of raw data.
This book focuses on exploring, analysing, and visualizing big data in Hadoop and NoSQL data stores with this powerful full-featured big data analytics platform.
You will begin by learning the Hunk architecture and Hunk Virtual Index before moving on to how to easily analyze and visualize data using Splunk Search Language (SPL). Next you will meet Hunk Apps which can easy integrate with NoSQL data stores such as MongoDB or Sqqrl. You will also discover Hunk knowledge objects, build a semantic layer on top of Hadoop, and explore data using the friendly user-interface of Hunk Pivot. You will connect MongoDB and explore data in the data store. Finally, you will go through report acceleration techniques and analyze data in the AWS Cloud.
Style and approach
A step-by-step guide starting right from the basics and deep diving into the more advanced and technical aspects of Hunk.
Подписаться на:
Сообщения
(
Atom
)